- Identify the job tasks for the project. For faster turn around time with completing projects, plan on entering 5 or 6 job task per project.
- If possible, try scheduling times to shadow the job task when entering the instructions to get a more accurate account of the task steps.
|
- Select Features>User Menu
- Select the project from the assigned projects grid
- If a project does not exists follow the Need a New Project branch to create the project
|
The job task header provides areas for entering the purpose and scope describing the job task.
- Project > New Documents > Document Headings > Job Task Instructions
- Enter a title for the Job Task. Title should be easily recognizable for the users
- Enter the purpose for the job task. The content of the purpose should summarize what gets accomplished when performing the job task.
- Enter the scope for the job task. The content of the scope should describe the extent of the work for the user. The scope can be a list attributes about the task. For example: Average time needed to complete the task. How many items are typically addressed during the job task. Is the task performs on a schedule or on an as needed basis.
|
Setup actions describes to steps to prepare for a job task before starting the core job task work.
These actions could be prepping the work area or identifying the list of items being worked on in the job task.
If the job task requires multiple types of preparation use additional setup actions.
Adding Setup Action:
To add the first action the menu option is with the procedure header: Insert Initial> Setup Action
Additional actions are added with the menu option is on the previous action.: Add Section > Setup Action
Entering Setup instructions:
- Enter a descriptions for the setup action. For the setup action description describe what will get accomplished during the setup. The field limit is 50 characters and will be shown on the outline. Additional purpose information can be added in the editor.
- Skip the Type selection. Will only need to use the Type field to change the type of action (Work Action to Setup Action).
- Skip the Outline Level selection. Outline levels are more useful with information documents to create sub-headings in the outline.
- In the editor: For additional purpose information use the "optional purpose" area in the editor. Delete the optional purpose label if no additional information is required.
- Use the number list for the action steps.
- Select save when finished.
Note: Multiple setup actions were used in this set of instructions. The setup actions were Identify job tasks and Opening Project.
|
Work actions are the instructions for the core work of job tasks. Note: A separate work action is typically created for each of the system interfaces (software screens, documents, etc) used in the job task to reference or update information. The instructions in the action is focused on the use of the interface item.
Adding work actions: Add a work actions using the menu option is on the previous action.: Add Section > Work Action Entering work actions instructions:
- For the work action description describe what will get accomplished or the purpose for using the software screen or document. The field limit is 50 characters and will be shown on the outline. Additional purpose information can be added in the editor.
- Skip the Type selection. Will only need to use the Type field to change the type of action (Work Action to Setup Action).
- Skip the Outline Level selection. Outline levels are more useful with information documents to create sub-headings in the outline.
- For additional purpose information use the "optional purpose" area in the editor. Delete the optional purpose label if no additional information is required.
- For the first step start with an "Open XXX at AAA>BBB>CCC" type statement to open the screen or document. The XXX is the document/screen name and the ABCs are the menus / path separated by the ">" symbol to reach the document or screen.
- Plan out the steps for using the interface. Keep the steps simple the more intuitive the interface the less instructions needed.
- Write the steps using a active voice.
- If areas or fields of the interface is not used by the job task add steps to skip those fields or areas.
- Use the following type of statements to address when fields are used on a conditional basis:
- For a single condition use a simple if statement followed by the action (If X is true enter the value if field Y).
- For more complicated conditions provide the instructions using a decision table.
| Conditions |
Action |
| If A is true and B is false |
Enter value Y |
| If both A and B are true |
Enter value Z |
| If A is false |
Enter value X |
To insert a decision table use the Template button > Tables >decision table.
- If a condition exists where the user will need follow a branch of instructions add condition statements to identify the branch to follow:
(If this condition exists follow branch XXX to address the condition) - Select Save when finished
Note: If branching is needed use the "Add Task Branch" branch for instructions on adding a branch. If needed multiple branches can be added to the same action.
|
Cleanup actions describes to steps to complete a job task after the core job task work is finished.
These actions could be cleaning the work area or filing items worked on in the job task.
If the job task requires multiple types of cleanup use additional cleanup actions.
If the job task does not require any work after the core work is finished skip adding cleanup actions
Adding Cleanup Action:
Additional actions are added with the menu option on the previous action.: Add Section > Cleanup Action
Entering Cleanup instructions:
- Enter a descriptions for the cleanup action. For the cleanup action description describe what will get accomplished during the cleanup. The field limit is 50 characters and will be shown on the outline. Additional purpose information can be added in the editor.
- Skip the Type selection. Will only need to use the Type field to change the type of action (Work Action to Setup Action).
- Skip the Outline Level selection. Outline levels are more useful with information documents to create sub-headings in the outline.
- In the editor: For additional purpose information use the "optional purpose" area in the editor. Delete the optional purpose label if no additional information is required.
- Use the number list for the action steps.
- Select save when finished.
Note: Multiple cleanup actions were used in this set of instructions. The setup actions were Reviewing Procedures and Releasing Project.
|
Review instructions for administrative settings and for accuracy.
- Review the instructions for accuracy.
- Check for new procedures being assigned to role. The project section will indicate if any documents are not assigned to a role. The process administrator needs to assign the documents to document roles.
- Check for document placement in document group. New documents default with a "Not Set" document group placement. To assign document group placement for new documents created in the project follow the branch instructions "Assign Documents to Groups". Note: The process administration can also arrange the group placement for all documents (new and existing).
|
The steps needed to approve and release the project depends on the users authority assignment.
- Users with just authoring authority can just start the approval process by selecting the menu item Approvals > Start Approvals.
- Users with approval authority can just start approvals like an author or they have start and approve the project at the same time by selecting the menu item Approvals > Start Approvals and Approve. If the approval process already started the user has the option to approve the project.
- If the user is the only one with approval authority they have addition menu selections also release at the same time as approving.
- If there are multiple users with approval authority the menu option to release the project only after all the approvers approve the project.
- All approval type selections options require the user to enter their password.
|
|
Explanation/Purpose
of Branch:
|
Instructions for creating a project |
|

|
|
2.A .1 Create Project
|
|

|
The Create a Process Project is a user feature for creating or modifying documents or user interfaces for a process.
This feature is only available to users assigned to the implementation team for a process.
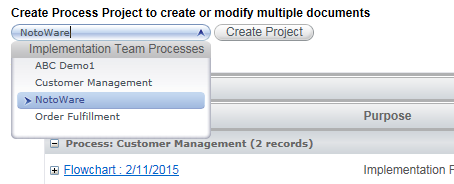
| Field name/Feature |
Description |
| Implementation Team Processes |
Select the process for the process project. The process list includes the processes where the user is assigned to the implementation team. |
| Create Project button |
Creates a process project for the selected process. |
- Select menu Features > User
- In the Create Process Project section select the process for the project
- Select the Create Project button
|
|
|
|
2.A .2 Update Project Information
|
|
|
Modify project information

| Field name/Feature |
Description |
| Project |
Name of the project. |
| Project Owner |
Project owner can be selected for the project team. |
| User Role |
Project team role for the current user |
| Status |
Status of project. Status of project are assigned through work flow operations.
Statuses:
- New/Open: New project
- Review: Project is under review for approvals
- Released: Project is released
- Deactivated: Project was canceled
|
| Project type |
Two Project types:
- Process: Project type is creating and modifying multiple documents and user interfaces can be modified with process project. Project team is manually added or based on implementation team assignment.
- Document: Project type is for maintaining a single documents. Project team is based on author and approver document role assignments.
|
| Approval Group |
Approval group is for selecting how the project will be approved for release. The approval group selection defaults to approvers. Approval options are:
- Approvers: User with approvers assignments needs to approve project before release.
- Approvers and authors: Both approvers and authors need approve project before release
- No Approval: No approval required before release
|
| Start Date |
Date the project a created |
| Planned Release |
Select date for planned release. |
| Purpose |
Enter brief purpose for the project |
| Save |
Save new project |
| Cancel |
Cancel project creation |
Projects are created with default generic information. Update the project with information more meaningful to the team
- Change the name for the project
- Enter brief purpose for the project.
- Modify project owner to another team member if needed
- Modify planned release date.
- Select Save.
|
|
Explanation/Purpose
of Branch:
|
The instructions in this branch is for assigning new documents created in the project to groups. |
|

|
|
7.A .1 Arrange Documents in Groups
|
|
|
The Organize New Documents screen is to organize the new documents into groups and position.
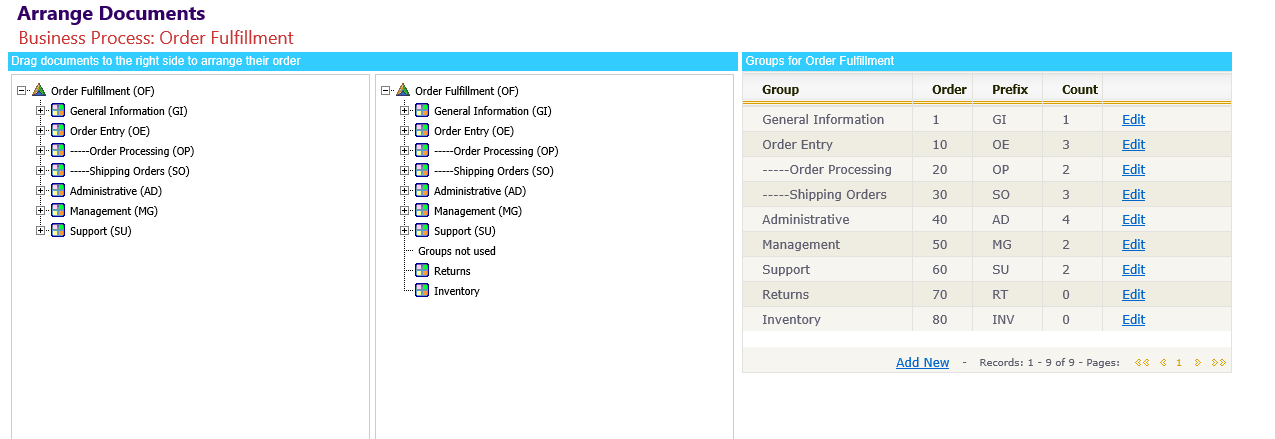
| Field name/Feature | Description | | List of documents. | The documents are displayed in two lists. The left list shows the current document arrangement. The right list show the document arrangement and available groups for the business process. To arrange the documents drag the documents from the left list to the desired group and document position in the right list. Only new documents can be arranged. | | Process Group List | The group lists is for defining and ordering the groups used for arranging the documents. The groups are to organize the documents into sets that best fits the business process. The group grid has the following columns: - Group: Name of the group
- Order: Numeric value to control the order to display the group
- Prefix: Acronym for the group to be displayed as part of the document id.
- Count: Count of documents in the group
- Edit: Edit the name, order and prefix of the group.
- Delete: Deletes the group if document count is 0.
- Add New: Add new group
|
Only new documents can be arranged in groups
- Open Arrange Documents screen by going the project section and select menu item New Documents > Organized New Documents
- On the right side outline select the group where you would like to place the documents. This displays the documents in the group.
- On the left side outline find the documents. To arrange the documents drag the documents from the left outline to the group and document placement location on the right outline.
Note: Dragging action is perform by holding the left mouse button down and releasing the button when the item is dragged over the new placement location.
Adding new groups.
- Adding groups is performed by selecting the Add New option in the grid on the right side of the screen.
- Enter the group name .
- Enter a number used to arrange the order of the groups. Hint: Use non-adjacent numbers like 10,20,etc. This allows room for inserting new groups.
- Enter a 3 letter prefix/abbreviation for the group. The prefix is used as part of the document id.
- Select save.
- The group will be displayed in the outlines and can be used for arranging documents.
|
|
Explanation/Purpose
of Branch:
|
A task branch contains the set of instructions to address a work condition.
The following instructions contain the actions for adding a branch.
|
|
|
|
|
5.A .1 Add Branch to Procedure
|
|
|
The Modify Section screen is for modifying the sections of document
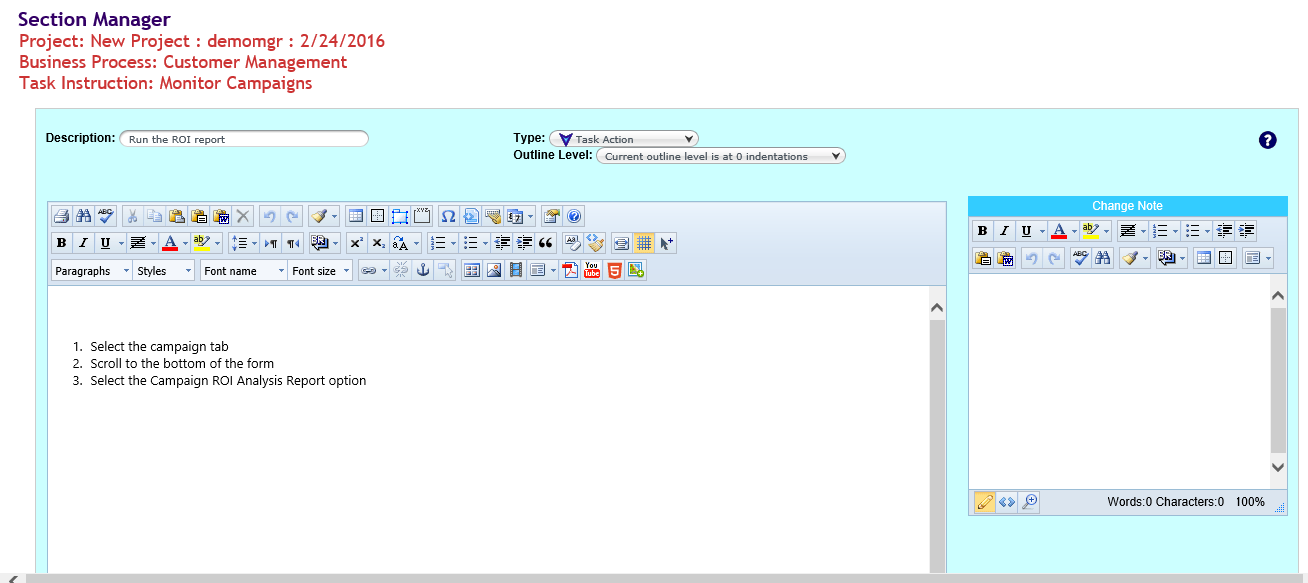
| Field name/Feature |
Description |
| Document Labels |
The labels displays the following information about the section: - Project: Current project
- Business Process for the document
- Document for the section.
|
| Description |
Description of the purpose for the section |
| Type: |
Type of information captured in the section. |
| Outline level. |
Sets the outline level to create subsection for documentation |
| Help button |
Display help screen for the section type |
| Editor |
Editor is for entering the content for section. The template for the section type will be displayed in the editor. |
| Change Notes |
For notes about section changes if the section is being modified. Change note editor is not displayed for newly added sections |
| Save button |
Saves the section changes |
| Cancel button |
Cancels the section changes |
Branch sections serve as a header for the branch of instructions..
Adding Branches: Add a branch using the menu option is on the previous action.: Add Branch > Branch Entering branch information:
- For the branch description describe what will get accomplished by the branch instructions. The field limit is 50 characters and it will be shown on the outline.
- Skip the Type selection. Will only need to use the Type field to change the type of action (Work Action to Setup Action).
- Skip the Outline Level selection. Outline levels are more useful with information documents to create sub-headings in the outline.
- In the table section to the right of the "Explanation/Purpose of Branch:" enter a brief description of the purpose of the branch.
|
|
|
|
5.A .2 Add Work Actions to Branch
|
|
|
Work actions for branches follow the same guidelines as general work actions.
Note: A separate work action is typically created for each of the system interfaces (software screens, documents, etc) used in the job task to reference or update information.
Adding work actions:
Add a work actions using the menu option is on the previous action.: Add Section > Work Action
Entering work actions instructions:
- For the work action description describe what will get accomplished or the purpose for using the software screen or document. The field limit is 50 characters and will be shown on the outline. Additional purpose information can be added in the editor.
- Skip the Type selection. Will only need to use the Type field to change the type of action (Work Action to Setup Action).
- Skip the Outline Level selection. Outline levels are more useful with information documents to create sub-headings in the outline.
- For additional purpose information use the "optional purpose" area in the editor. Delete the optional purpose label if no additional information is required.
- For the first step start with an "Open XXX at AAA>BBB>CCC" type statement to open the screen or document. The XXX is the document/screen name and the ABCs are the menus / path separated by the ">" symbol to reach the document or screen.
- Plan out the steps for using the interface. Keep the steps simple the more intuitive the interface the less instructions needed.
- Write the steps using a active voice.
- If a condition exists where the user will need follow a branch of instructions add condition statements to identify the branch to follow:
(If this condition exists follow branch XXX to address the condition)
- Select Save when finished
Note: If branching is needed use the "Add Task Branch" branch for instructions on adding a branch. If needed multiple branches can be added to the same action.
|
|
|
|
5.A .3 Add Go to section for last action
|
|
|
After the branch last section add a link on which task section the user should go to when the branch is completed.
The go to section link will also be displayed on the outline.
- On the last task section select the Modify menu option to edit the action.
- Below the editor is an outline control displaying the task sections. The outline control is only displayed for the last action of the branch.
- On the outline control select the section the user should return to. To remove the selection use the remove selection option at the bottom of the outline control.
- If the branch completes the work for the task item.
- Skip using the outline to select a go to section.
- Using the type control above the editor select the last action option. This selection will display a stop symbol as the icon for the last section.
- Select the Save to save the selections.
|
|
|